How to reduce “didn’t fit” returns on your Shopify store without changing your products
If you run a fashion or apparel store on Shopify, you’ve probably seen this line far too often in return reasons: “Didn’t fit.” The product quality is fine. The customer liked the style. But the size wasn’t quite right, so the sale is effectively undone, and you eat both shipping and restocking costs.
The good news is you don’t have to redesign your products to fix a large chunk of these returns. In many cases, the real problem is how sizing information is presented, especially for customers shopping on mobile or from different countries.
In this post, we’ll look at how to reduce “didn’t fit” returns by improving your size guides and adding an interactive fit helper, using RMS Size Helper as a practical example.
Why customers pick the wrong size
Most customers don’t read size charts carefully. When they do, the charts are often:
- Hidden behind a small link that’s easy to miss
- Only in one unit (usually inches or centimetres, not both)
- Not adapted to different country standards (US vs UK vs EU sizing)
- Ignoring how people actually think about fit (body shape and preference)
So customers end up guessing based on what they wear in another brand or what “feels right” from the dropdown. That guess is exactly what shows up later as “didn’t fit.”
RMS Size Helper is designed to remove as much guesswork as possible by combining a clear, localised size chart with an interactive survey that guides customers to a recommended size.
Step 1: Make your size chart impossible to miss
Start by giving your size guide the same importance as your images and price. That means:
- Place a “Size guide” or “Find my size” link close to the size selector and Add to cart button.
- Make sure it’s easy to tap on mobile and clearly labelled.
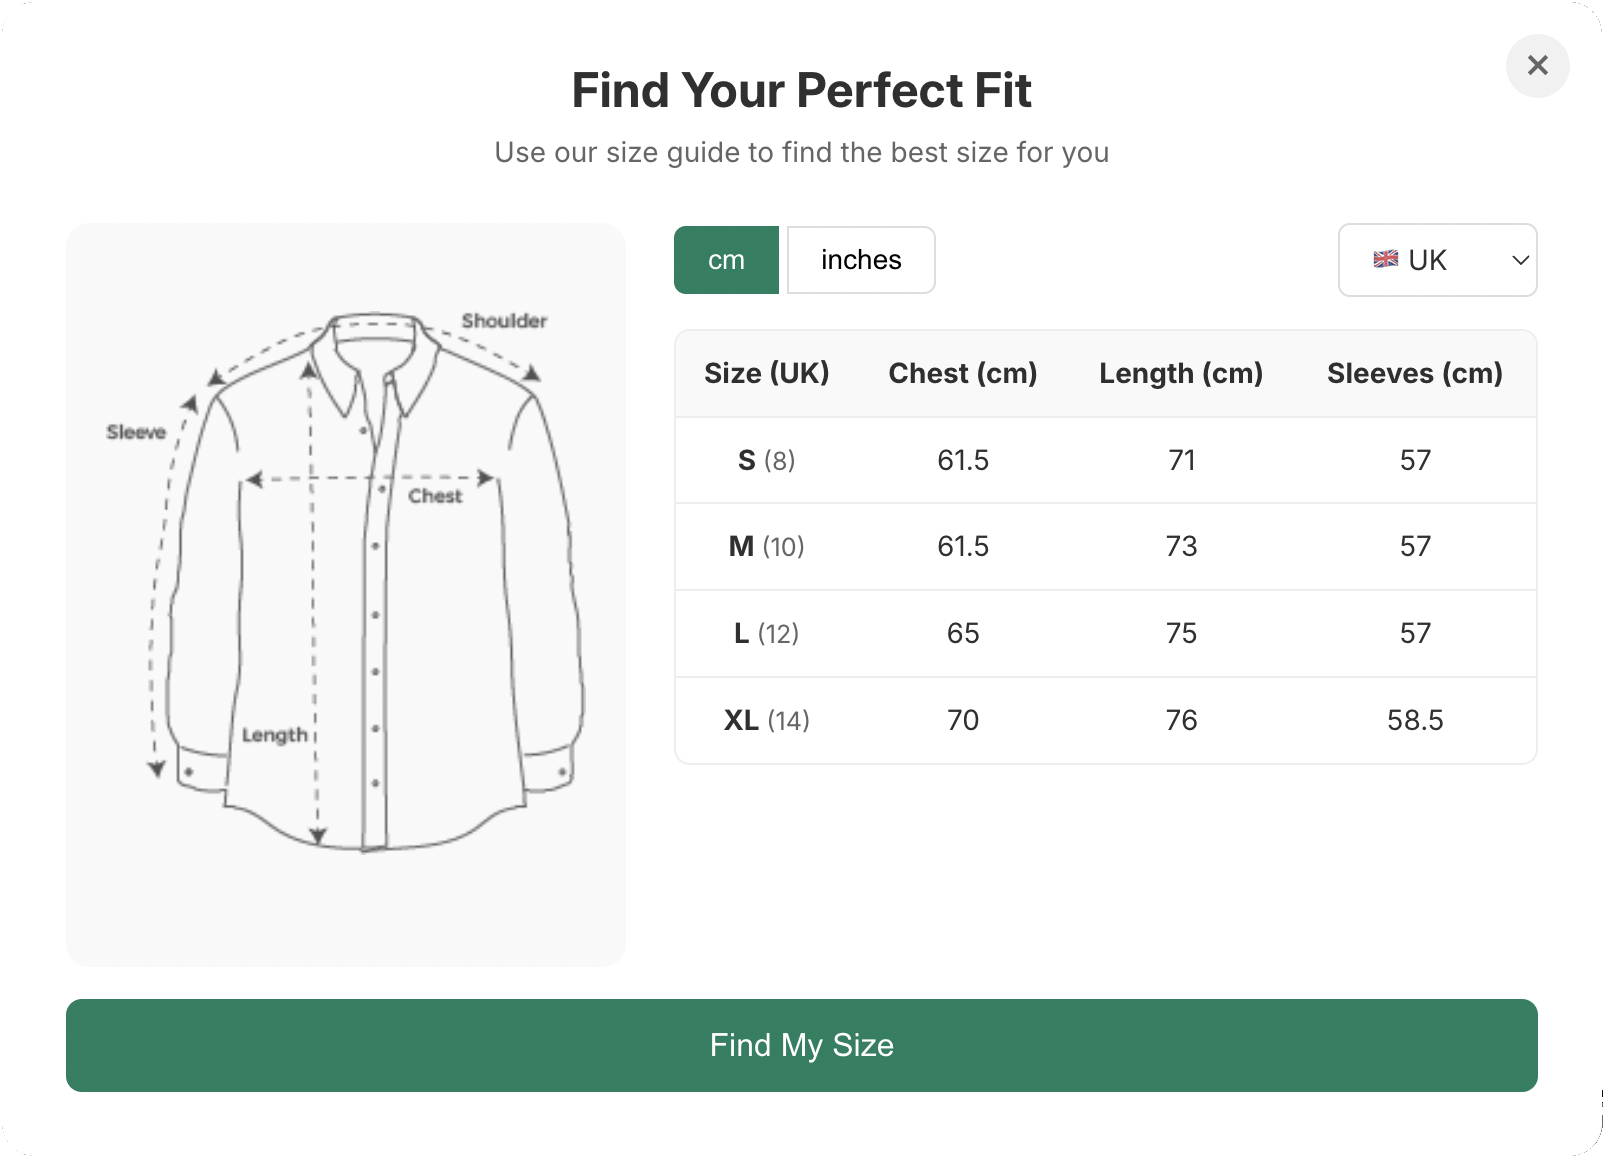
With RMS Size Helper, you can add a dedicated size chart that appears in a modal or drawer, so customers don’t lose their place on the product page. The chart can show:
- Measurements in both centimetres and inches, so customers don’t have to convert mentally
- Clear measurement points (bust, waist, hips, length, etc.)
This alone makes it much easier for customers who do measure themselves to choose correctly.
Step 2: Handle international size conversions properly
If you sell to more than one country, you’re probably already familiar with the chaos of size standards:
- A UK 10 is not the same as a US 10
- EU numbers look completely different again
- Customers often don’t know their size in your store’s default standard
Instead of expecting customers to know how to convert, your size guide should adapt to them.
RMS Size Helper lets customers pick their country (or a standard like US / UK / EU) from a dropdown. The chart then displays sizes in their familiar standard, while still being based on the underlying measurements you define. That means:
- A US shopper can choose their usual US size and see how it maps to your garments
- A UK or EU shopper gets equivalent sizes in a way they recognise
- Everyone can still see the underlying cm/inch measurements if they want more precision
By meeting customers where they are, you make it far less likely that an international buyer chooses the wrong size.
Step 3: Add an interactive “Find my size” survey
Even with a good chart, many shoppers still feel unsure. They might not have a tape measure, or they don’t want to spend time measuring before buying. This is where an interactive survey can make a big difference.
RMS Size Helper includes an interactive survey that asks simple, customer‑friendly questions such as:
- How do you usually like this type of item to fit (tighter, regular, relaxed)?
- Which body shape is closest to yours, visually?
- What size do you typically wear in similar items?
Based on these answers and the size data you’ve configured, the app suggests a recommended size. This does two things:
- It gives the customer confidence—they don’t feel like they’re guessing
- It reflects both body shape and fit preference, not just bare measurements
The survey acts like a mini virtual fitting room, guiding the customer to the size that is most likely to feel right once the product arrives.
Step 4: Use what you learn to further reduce returns
Once your charts and survey are in place, you can look at the patterns:
- Are many customers sizing up in a certain product?
- Do some items consistently lead to “smaller than expected” feedback?
- Are certain sizes frequently recommended but rarely stocked?
When you see that customers often choose a different size than you would expect, you can:
- Add notes to the product description (“Runs small, size up if between sizes”)
- Adjust future production runs or buying decisions
- Update the fit survey logic for specific products
Over time, this closes the loop: better information leads to better size choices, which leads to fewer “didn’t fit” returns.
Start small and track the impact
You don’t have to overhaul everything at once. A simple path might be:
- Add a prominent size guide link and a chart with cm/inch.
- Turn on country‑specific conversions.
- Enable the interactive survey on a few key products with high return rates.
- Compare return reasons and conversion before and after.
RMS Size Helper is built to handle that entire flow with minimal setup, so you can make sizing clearer, reduce customer doubts, and see fewer “didn’t fit” returns without changing your designs.
From “I’m not sure about my size” to “Add to cart”: fixing the #1 hesitation in online fashion
Ask most online fashion shoppers why they don’t buy a piece they like, and you’ll hear some version of the same sentence: “I’m not sure about my size.”
In a physical store, that doubt disappears in the fitting room. Online, it turns into:
- Abandoned carts
- Endless size‑related questions in your inbox
- Hesitant customers choosing not to buy at all
In this post, we’ll look at how you can move customers from “I’m not sure” to “I feel confident enough to click Add to cart,” using RMS Size Helper as a concrete tool.
The hidden cost of size uncertainty
Size uncertainty shows up in your numbers as:
- Lower conversion rates on products with tricky fits
- Higher drop‑off at the size selection stage
- Customers adding items to wishlists but never checking out
This isn’t always obvious if you only look at top‑level analytics, but it’s a real leak in your funnel.
The key is to handle sizing as a guided decision, not as a small dropdown the customer has to guess from.
Make size guidance part of the product page, not an afterthought
First, treat sizing as a core piece of the product page experience:
- Place a visible “Find my size” or “Size guide” link right beside the size selector.
- Make sure it’s easy to use on mobile, where most customers shop.
With RMS Size Helper, you can show a dedicated size chart and an interactive size helper in one place, so customers don’t feel like they need to go hunting for information.
Show clear, flexible size information: cm, inches, and country standards
Different customers think about size differently:
- Some know their body measurements and prefer precise numbers.
- Some only know their usual “M” or “UK 10.”
- International customers may know one standard but not another.
RMS Size Helper addresses this by:
- Displaying measurements in both centimetres and inches, so everyone can use the units they’re comfortable with.
- Offering a country/standard dropdown (US, UK, EU, etc.) that converts sizes into familiar labels for the customer.
This gives shoppers multiple ways to find the right size:
- Measure and match
- Match to their country’s usual size label
- Use both if they want extra certainty
Use an interactive survey to bridge the last gap
Even with clear charts, many customers still feel unsure because numbers don’t tell the whole story. That’s where an interactive survey shines.
RMS Size Helper’s survey lets customers answer simple questions about:
- How they like their clothes to fit (snug, regular, relaxed)
- Their approximate body shape (with friendly visual cues)
- The size they usually buy in similar products
The app then combines this with your size data to suggest a recommended size.
This does a few important things psychologically:
- It transforms an abstract decision (“Should I pick S or M?”) into a guided answer (“Based on your answers, we recommend M”).
- It reassures customers that their personal preferences are taken into account, not just a generic chart.
- It gives them a clear path: click “Find my size,” get a recommendation, then select that size and add to cart.
When you remove that last bit of doubt, more customers feel comfortable buying instead of thinking “I’ll come back later.”
Where to place your size helper for maximum impact
To make this work smoothly:
- Keep the “Find my size” action next to the size selector and above the fold where possible.
- Label it clearly: “Find my size” tends to perform better than vague labels like “Info.”
- On mobile, make sure the button is large enough and the helper opens in a full‑screen or near‑full‑screen panel.
The experience should feel like a quick pit stop, not a detour.
Turning your size helper into a conversion asset
Once RMS Size Helper is in place, you can start treating it like a conversion lever, not just a support feature:
- Track how many visitors open the size helper and still buy.
- Look for products where the helper is used heavily—these are often the ones where customers would otherwise have abandoned.
- Test small changes in the wording of your “Find my size” link or button and see if usage goes up.
The aim is simple: if a customer pauses at the size selector, your helper should be the obvious next step.
When sizing help is integrated into your product page